Monday 7 April 2014

How to fix a crashed computer?

Are you experiencing an unexpected computer crash? Is it a headache for you to fix the computer crash? Read on this post to check the reason of the computer crash and learn more on how to fix a computer crash.


The signs of computer crashes include the terrible Blue Screen of Death, automatic restarting of the computer, or computer freezing up with no response. A computer crash can be caused by complexity reasons: new software or file installation, failure in hardware, registry error, and poor maintenance of the PC. Figuring out what may cause your computer crash is the first step to deal with the problem.


New software installation

If you are experiencing the unexpected computer crash with the installation of a new program, it is possible that the new installed program conflict with other program settled on the operating system. Under such circumstance, it's easy to fix the crashed computer by uninstalling the newly downloaded program. Restart your computer into safe mode and then go to "Control Panel", open "Add or Remove Hardware" and select the program that you suspect is causing problems. Select "Uninstall" and follow the prompts to remove the program. You may fail to boot into normal mode, so please just boot into safe mode to uninstall the program.


Hardware failure

Under the condition that it is the hardware failure that causes the computer crash problem, you need to check for updates of the drivers of any hardware connected to your PC. I highly recommend you keep updated with the latest patches of drivers and windows to avoid the problem of computer crashes. If you do not want to check periodically for the updates, you can takeWindows Update Downloader to quickly download and install updates.


Registry error or corrupted registry

Registry error or corrupted registry is also the most common reason for a crash computer. Registry files, also called “windows registry” is the files that give your computer instructions for what to do next. Any corruption or misplacement will lead to failure of a computer to get orders as what to do next. When you install a program, the key registry item was modified to allow the program run, but when you choose to uninstall a program, the registry remains in the registry entry. With time goes on, the registry goes into a mess. To fix computer crash caused by corrupted registry, you should clean the invalid and corrupted registry to maintain the computer performance. Regular registry clean should be performed to avoid the computer crash.

It is highly recommend taking Cloud System Booster to clean the registry and repair registry errors for better computer performance.


Virus or malware issue

You should never overlook virus infections. They are a potential cause of computer crashes because some virus or Trojan code can delete or corrupt your system files once they settled on your computer which may lead to fatal system errors, and finally cause computer crashes. Under this circumstance, prevention virus infection is more important than fixing the computer crash. If the computer crash is caused by virus or malware, it's very difficult to fix the problem due to the corrupted system file. You may have to reinstall your operating system to recover your computer.


It is recommended to use firewall protection, anti-virus software as well as anti-malware software to protect your PC against virus infection. Scan before downloading and installing a file or program. Never follow links contained within a suspicious email. Use common sense when you go to internet.

Internet Explorer Repair--Tips and Tricks

With the rise of third party browsers such as Google Chrome, Mozilla Firefox, Internet Explorer is still one of the most widely used web browsers. You may come with the situation that you need to repair Internet Explorer because the browser may produce problems such as it acts sluggish, displays error messages, crashes unexpectedly, or any other problems. This post describes how to repair Windows Internet Explorer in Windows operating system.


If you are experiencing Internet Explorer browser problem, please read on the following tips which can help you to repair you Internet Explorer problem. If you are using Internet Explorer 9, Internet Explorer 8, or Internet Explorer 7, any of the following methods may resolve your problem. Try the methods that best apply to your situation.


Internet Explorer gets hijacked


It happens that your Internet Explorer get hijacked when your computer get infected with virus, spyware, adware or any other malicious program unexpectedly. In such case, you are highly encouraged to start the repair your Internet Explorer with a thorough scan of the computer for virus infestations. Your installed anti-virus program may unable to detect anything since it did not block it before the malicious code sneak on your operating system. Good anti-malware program is more suitable to remove the virus.


Recommended Anti-malware program: Anvi Smart Defender Image


After you install the recommended anti-malware program, please make sure you perform a full system scan and clean any viruses, Trojans and other malicious software from the system. Please be patient as full scan is time-consuming. You may still have problem in your Internet Explorer after the virus cleaning such as unwanted homepage, unexpected pop-ups and more. You may need to read and perform more steps to repair your Internet Explorer.


Internet Explorer malicious search providers and toolbars/add-ons


If you have malicious toolbar installed on your Internet Explorer, you may unable to change your homepage. When you search with
Internet Explorer, you are always redirected to unwanted website or URL. You should check the installed add-ons and toolbars or the search providers.

To do this, please open your Internet Explorer, and then go to Tools and then Manage Add-ons. You will be prompted to windows as shown in screenshot below:


Image


Check carefully the add-ons in the list, for the malicious add-ons, please do not hesitate to disable it by right-clicking on them and selecting disable from the context menu or selecting them and clicking on the Disable button in the low right corner of the window.
For some uncertain add-ons, please search online for detail information before you disable them.

Image


Next, please switch to Search Providers module. In this panel, you can check the search engines you currently use. For unwanted search engines, you can remove or disable it easily. Remember that you have leave one search engine and make it as default engine.


Reset Internet Explorer settings

In those versions of Internet Explorer, you can repair damaged files, error message, missing registration information or malicious browser modification by resetting the Internet Explorer settings.


To do this, please start your Internet Explorer, click on the Tools menu and select Internet Option and continue. You will be prompted to Internet Option Windows as shown below:

Image


Switch to Advanced tab; click Reset under Reset Internet Explorer settings. In the Reset Internet Explorer Settings dialog box, click
Reset to confirm.

Image


Repair Internet Explorer with Tool--Anvi Browser Repair

Above tips can help you to fix your Internet Explorer problem, but you may ask if there any tool which can repair browser problem easily. Absolutely yes, Anvisoft devoted and developed a free tool to help you conveniently repair browser settings and networking settings such as homepage, safe startup items, DNS settings, Title Bar, BHO plug-in, etc, changed by malware to return smooth browser use.

Because antivirus, antimalware tool can only helps detect and remove malware infections from computer, but can't do the duty to repair the damage caused by the virus. This free tool will practically assist normalizing safe browser searching. Anvi Browser Repair
Tool is designed to help fix browser, network settings altered due to rogueware/malware infections and even facilitate malware removal with one-click solution.

How to Recover Lost Files from Mac

Apple devices is becoming more and more popular in today’s society. Almost everyone wants an apple device whoever he is because of its fast operating speed and beautiful outlook. But nothing is perfect, there are upset things happening, such as losing data. Are you still anxious about recovering lost files from a crushed Mac Pro?

[Also read: Backup your Mac]

Data recovery
Data loss happens due to a lot of reasons, such as, unexpected power-off, system crush, virus attack and hard disk corruption.

Accidentally formatting is the most common cause of losing data. If you are an attentive PC user, you may do some safeguard procedures to protect the data when you encounter such problems which may relive the embarrassed situation. But in order to get back the complete data from a crushed Mac Pro, researchers has developed a data recovery software for Mac which can help common PC users to recover lost files such as pictures, music, videos easily within a few minutes.

10 Cool Tricks & Hacks That You Can Learn From Computer Geeks

computer geeks

Have you ever wondered why so many people out there can do wonders with their computers? Not because they are nerds. They have learned several computer hacks, tricks and shortcuts to impress their friends, and guess what? They have managed not only to impress their friends, but also to find a good job or earn money online by showcasing their skills. By reading this article you won’t necessarily become an expert in using a computer, but you will certainly become much better at using your computer.
Whether you are just a basic user or you have plenty of experience in using computers, you will find the following 10 computer hacks and tricks extremely useful. After reading this article, you will be able to impress your friends with your newly acquired computer skills.


10 Computer Hacks & Tricks


1. Learn How to Use the Command Line

The truth is that using the command line is not as exciting or easy as it seems like in Hollywood movies. However, learning how to use the command line might prove to be extremely helpful. Power users adore using the command line, because they can perform complicated tasks by simply pressing a few keystrokes.
There are a wide variety of shortcuts, but it takes too much time to present them all here. However, if you want to learn more about using the command line like a pro, check the following link: Become a Command Line Ninja With These Time Saving Shortcuts

2. Find Additional Uses for Programs you Already Have

Computer nerds will always think out of the box, especially when it comes to finding new uses for the tools and programs they already use. Most programs can be used for more purposes, in addition to their original one. For instance, the file-syncing program, Dropbox, can be used to monitor your home computer, download torrents or even print files from afar. You can also use Gmail to find out if someone has stolen your phone.

3. Understand When Too Much is Too Much

When your computer starts to work a little too slow, you need to find out the real cause behind this problem. Usually, one app will slow your system down, so you need to find it and close it as fast as possible.
The following tools should help you find the real cause and terminate it: Rainmeter (for Windows) and MenuMeter (for Mac).

4. Know the OS’s Hidden Features

Every operating system (OS) has its own tricks and features hidden under the hood. System tweakers such as OnyX for Mac and Ultimate Windown Tweaker are simply great for finding secret features. If you are a Windows user, you can learn how to hide secret data inside a file, cascade specific windows or undo an accidental file move.
As a Mac user, discover how to create search tokens when searching for specific files, manage the privacy settings of an app or automatically restart your computer when it freezes.

5. Learn How to Crack Passwords

By learning how to break into a computer you will certainly increase your self-esteem. Everyone knows how to create secure passwords, but only a legit computer hacker knows to get the data they want. This is also a good exercise, because you will learn how to protect from cyber criminals in the future.
Some of the worlds most famous hackers have been hired for government operations and international projects to defend against other cyber attackers. We don’t condone hacking, it does help though to be one step ahead of a cyber bully heading your way though.
computer nerd

6. Use the Scheduling Tasks

Sometimes it is better to stop performing all that system maintenance all by yourself. The built in task scheduler allows you to run any task you need, whether it is defragmentation, picture upload, reminders or even alarms.

7. Use the Keyboard More

A true computer geek knows all the basic keyboard shortcuts, such as “ctrl-C or ctrl-V”. Learn the most common shortcuts for Word, Gmail, Photoshop and other programs you use on a regular basis. After only a few months, you will be able to blow through text boxes and menus at unbelievable speeds with precision.

8. Discover New Operating Systems

If you really want to impress your friends, you should try to learn more about Windows, Mac and Linux.
Each OS has its own pros and cons that can be noticed with ease, so learning more about each system should not be such a daunting task. The cool thing is that there is a lot of software out there nowadays where it allows you to install another operating system on your computer so you can switch between each Operating System when you please.

9. Protect Your Data

Hide your precious info into a text file and hide it in a secret location on your computer.
Don’t forget to “Empty” your Recycle Bin or Trash on your computer once you have sent unwanted files or data there, that way it makes sure that nothing can be retrieved by any surprise guests you may have access your computer.

10. Tweak Your Hardware

With a bit of professional tweaking, you can now push your computer past its original limits. Installing Mac on non-Macs and over clocking your processors are not so hard to accomplish.
There are instructions out there to find out the details of your computers hardware, google search how to find your computer models information, note down the RAM and go down the road to your local computer hard ware store and buy bigger RAM sticks eg… 8GB, 16GB, 32GB etc… (Just make sure that each stick is the same make and model if you can for the best performance.
Jump on YouTube and learn how to Install RAM in your particular type of computer, this will increase your computers memory allowing your computer to run more efficiently.


All these cool simple tricks and hacks that can be learned from computer nerds are extremely useful, but require a little time and patience in the beginning.

Enjoy them and become a true computer geek.


If you have come across any cool hacks or tricks on your computer that have turned out to be pretty useful please share them with us in the comment section below.

Publisher to PDF Free Online

Publisher-To-PDF-Screenshot
Are you looking for a quick and easy solution on how to convert Microsoft Publisher to a .PDF Document?

Look no further as Publisher to PDF Free Online is a free online publishing tool that will do the the job for you.
Use publishertopdf.com to convert Publisher into PDF so you can share your work with anyone. It is 100% free! and simple to use. All you need do is upload your publisher document, fill in your e-mail address and click the send button and your pdf file will be created and delivered right to your email address.
“With Publisher to PDF  you can Convert Publisher(.pub) tot PDF instantly for FREE!”
Features:
  • Share with Anyone:
    Microsoft Publisher is a powerful desktop publishing tool. However, many computer owners do not have publisher. Use publishertopdf.com to convert publisher into PDF so you can share your work with anyone.
  • Easy PDF Creation:
    www.publishertopdf.com is 100% free and simple to use. All you do is upload your publisher document, click a button and then get your pdf file delivered right to your email address. Use us to convert publisher (.pub) to PDF instantly!
  • Retain Look and Feel:
    Microsoft Publisher is used by many to create professional looking documents, complete with formatted text and images. For users wanting to share their publisher documents exactly as they created them, PDF is the perfect format.
Note:
They give their guarantee: that your Email Address will NEVER be sold, rented or provided to any third party. Period.


Requirements:
Publisher Document  (.pub file) 
Rating: 4.0/5 (1 vote cast)

How To Install Whatsapp on Your PC or Laptop

Whatsapp is a free cross-mobile messaging platform which is well known to most of us. Whatsapp cuts down our SMS bills as well as provides a lot of other features like group chat, lets you send photos and videos. You can even share your current geographic location with your friends.

undefined

As mentioned above, Whatsapp is a messaging platform for mobiles. Currently, Whatsapp is available for iPhone, Blackberry, Nokia S40, Symbian and Windows Phone.

But there are a lot of users with some other mobile phones who don't want to miss out from the world of Whatsapp either. Are you one such mobile user?

Then there is a solution for you that will let you use Whatsapp with your laptop or even your PC!


How To Install Whatsapp on Your PC or Laptop


To run Whatsapp on a computer, we are going to use a tool named "Bluestacks".

Bluestacks is actually a tool that lets you emulate android applications on Windows OS like Windows XP SP3 and higher. Just like any other android application, Whatsapp can be run using bluestacks easily. Download bluestacks from here: bluestacks.com

After downloading and installing bluestacks, run and search Whatsapp from the search bar provided in bluestacks or alternatively you can download Whatsapp from its official site here: www.whatsapp.com

Now follow the steps shown on screen to install Whatsapp on your computer. You may need to confirm your mobile number during the installation. For this, you will be sent a special code to your mobile number which you need to re-enter when asked by Whatsapp during installation.

Thats it!

Now you are done with installing Whatsapp on your Laptop or PC and you can use it without any kind of limitations as perfectly as you could with a smartphone.

Common Issues Faced

  • Unable to download Whatsapp directly from Bluestacks - Try downloading Whatsapp using your computer's browser from the official whatsapp site or from some other website providing android application (apk) files.
  • How to add contacts to Bluestacks - Go to settings, manage contacts, then click on the menu button provided on the lower left side of Bluestacks and select "New Contact".
Any more issues?

How many of you are going to use Bluestacks now? I hope you don't come across any issues but even if you do face any problems installing Whatsapp on your PC or laptop, do comment and let me know.

How To Install More Than 1 OS On A Single Partition Using VirtualBox

How To Install More Than 1 OS On A Single Partition Using VirtualBox


You may be a Windows user, a Linux user or you may be using some other operating system. It may happen that you want to try out any other OS or you may be a developer using some other OS.

In this case you have 2 primary options to install the second OS on your computer:
1. To install the second OS on a different partition and use a multi-partition system.
2. To install the second OS on the same partition.

The first option of creating a separate partition may create some issues in the long run. Either that the two OS may not be a well compatible one or  your hard drive may get corrupted more easily due to viruses or other vulnerabilities.

And that is why you might be interested to know more about the second alternative i.e. to install the another OS on the same partition and more specifically - on the same OS.

This is possible with - VirtualBox.

VirtualBox

VirtualBox is a freeware software that can emulate a virtual hard drive using some space on your real hard drive on some OS. The virtual hard drive on the VirtualBox system can then be used as a new computer itself and can be used to install and use any other OS that you can install on any normal hard drive.


To know more about VirtualBox and to download VirtualBox visit here: Virtualbox.org

For an example on how to use VirtualBox, we will have a look at creating a virtual hard drive and installing Windows XP on it.

How To Install Windows XP In VirtualBox


I chose Windows XP for this tutorial because there are a lot of Linux users and developers who use this OS for testing and other purposes. And Windows XP is still the most preferred OS in the world.

So let us start with the steps:

1. Download and install VirtualBox


2. Run VirtualBox And Create New Virtual Machine

Using VirtualBox To Install an OS

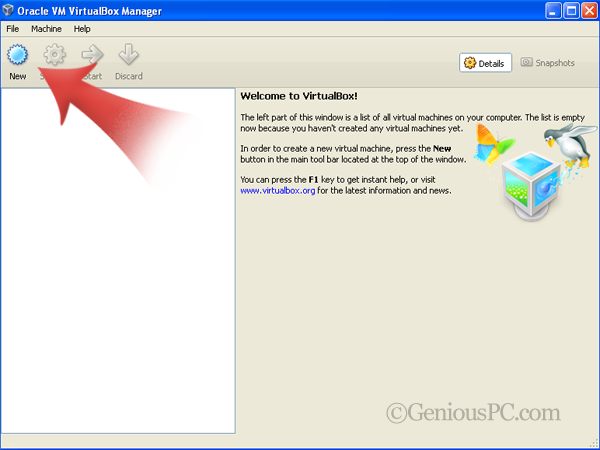
  •  Start VirtualBox and select on the 'New' button to start the "Create New Virtual Machine" Wizard.

Using VirtualBox To Install an OS

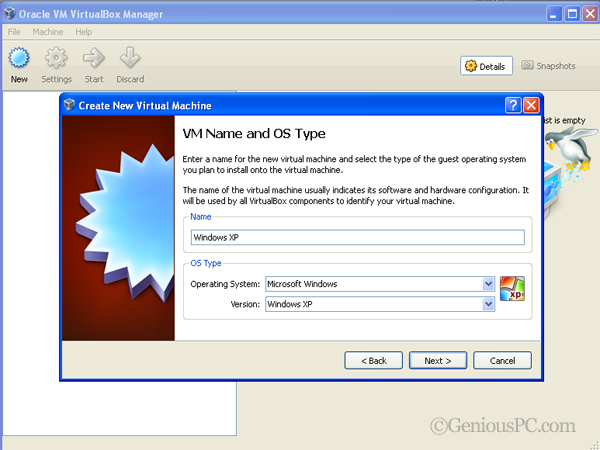
  •  Choose a name for your Virtual Machine (VM), select an OS and its version from the list.

Using VirtualBox To Install an OS

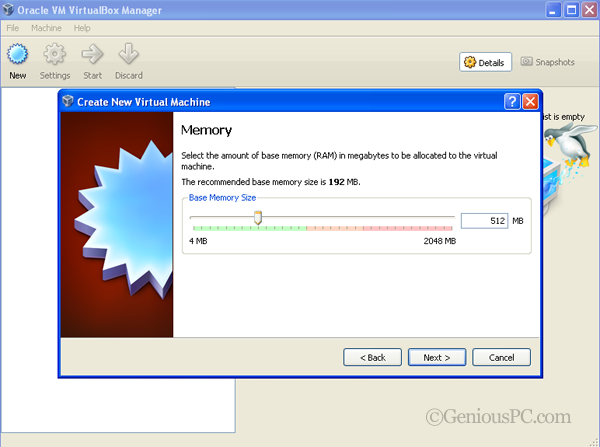
  • At this stage, you have to select the amount of RAM you would like to dedicate to your virtual machine.

Using VirtualBox To Install an OS

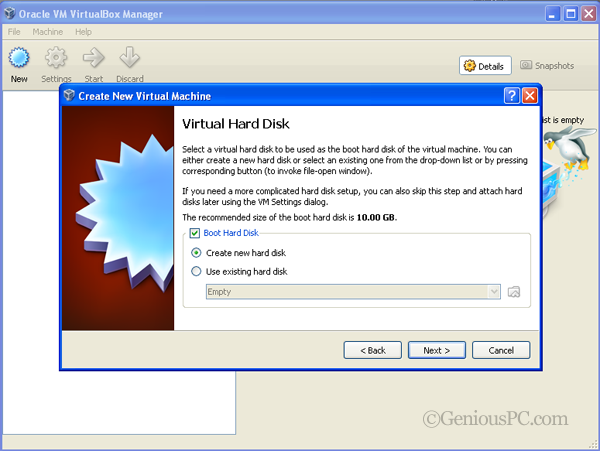
  • If you have never created a virtual hard disk with VitualBox before (which I suppose here), then you would have only 1 option and that is to create a new one now.

Using VirtualBox To Install an OS
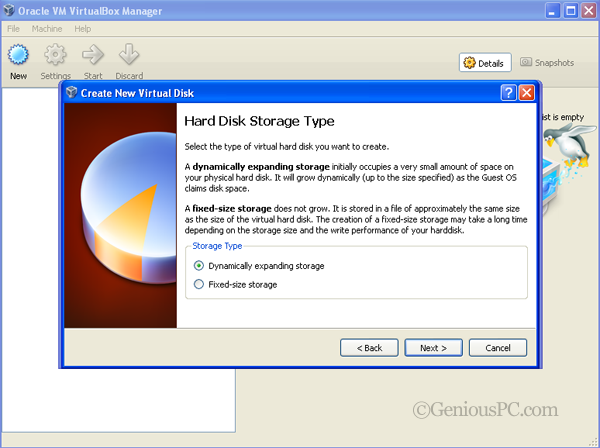
  • Now there are 2 types of hard drives that you can create using VirtualBox. First is the dynamically expanding one which uses less space in the beginning and expands as needed. This one is ideal for those with smaller hard drive. The second one is of fixed-size which is better in case you have a larger hard drive and can wait a few extra minutes while the virtual drive is being created.

Using VirtualBox To Install an OS
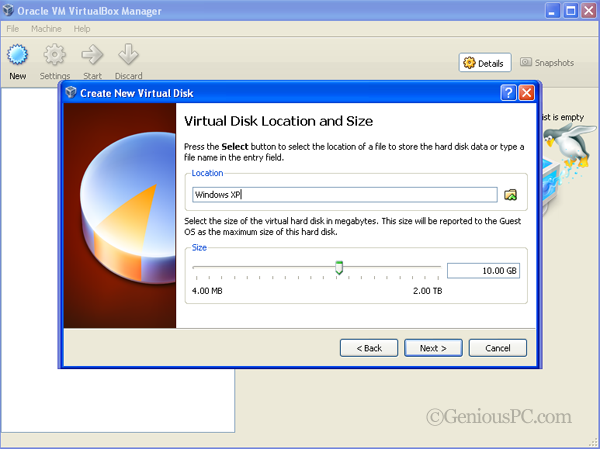
  • After that, choose a name for your virtual disk and assign a size to it. For OS like Windows or Linux, about 6-10 GB would be sufficient to install and run the OS for minimum usage level. But if you are interested in installing the OS for heavier use and for storing a moderate or large number of files even in that second OS, you should assign at least 50 GB to your virtual hard disk.
Using VirtualBox To Install an OS
  • Check the final summary and click on 'Finish' to complete the process of creating the virtual machine.

3. Attaching The Required Removable Media To Install The OS


After having created the virtual machine along with the virtual hard disk, the next task is to attach the removable media which contains your OS installation files like a DVD or CD.

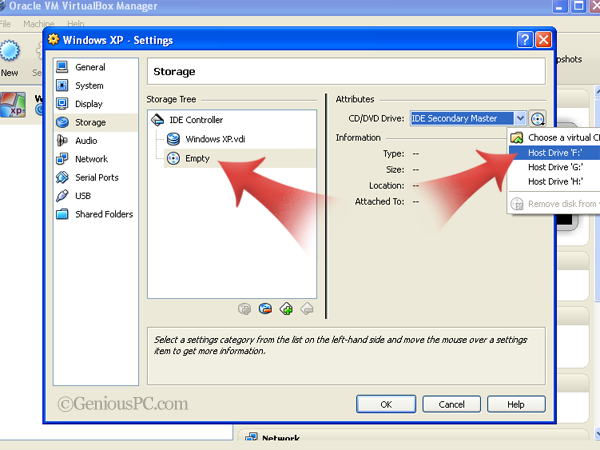
Select the newly created VM and click on "Settings" icon. Then go to storage settings.

Using VirtualBox To Install an OS

As shown in the figure, select the empty storage below the newly created virtual drive and then assign the removable media you want to use with it. You can select a CD/DVD or even a pendrive.

Now you are almost done with your VM.

4. Run The VM And Install Your OS


The last step is to run your virtual machine and install the OS from the removable storage you selected just a few while ago.

Select the VM from the main screen and click on the "Start" icon.

That's it!

Your virtual machine will now start just like a brand new unused computer. Follow the installation steps you perform with any normal hard drive and install the OS on your virtual hard drive.

[Note: If you want to install Mac OS X on VirtualBox, refer this tutorial.]

After the installation is over, you can start using the virtual OS as you would use if you installed it on a separate partition! And that too without any risks, vulnerabilities or any kind of issues that you would face if you preferred a multi-partition system.

Tips And Summary On Using VirtualBox


  • VirtualBox is a simple and free solution to install more than one OS on your computer. There are a lot of issues with multi-partition systems that you can easily avoid with the help of VirtualBox.
  • To use more than 1 OS on your system, you need to install VirtualBox and create a virtual machine for your OS.
  • Assign enough RAM and hard drive space to your virtual machine so that it runs smoothly but doesn't trouble the main system at the same time.
  • Install your OS from the CD/DVD drive that you normally use and start using your 2nd OS! That too - within the same OS!
Facing any problems? Or any kind of errors? Be sure to drop a comment and let me help you!


How To Install More Than 1 OS On A Single Partition Using VirtualBox

How To Install More Than 1 OS On A Single Partition Using VirtualBox


You may be a Windows user, a Linux user or you may be using some other operating system. It may happen that you want to try out any other OS or you may be a developer using some other OS.

In this case you have 2 primary options to install the second OS on your computer:
1. To install the second OS on a different partition and use a multi-partition system.
2. To install the second OS on the same partition.

The first option of creating a separate partition may create some issues in the long run. Either that the two OS may not be a well compatible one or  your hard drive may get corrupted more easily due to viruses or other vulnerabilities.

And that is why you might be interested to know more about the second alternative i.e. to install the another OS on the same partition and more specifically - on the same OS.

This is possible with - VirtualBox.

VirtualBox

VirtualBox is a freeware software that can emulate a virtual hard drive using some space on your real hard drive on some OS. The virtual hard drive on the VirtualBox system can then be used as a new computer itself and can be used to install and use any other OS that you can install on any normal hard drive.


To know more about VirtualBox and to download VirtualBox visit here: Virtualbox.org

For an example on how to use VirtualBox, we will have a look at creating a virtual hard drive and installing Windows XP on it.

How To Install Windows XP In VirtualBox


I chose Windows XP for this tutorial because there are a lot of Linux users and developers who use this OS for testing and other purposes. And Windows XP is still the most preferred OS in the world.

So let us start with the steps:

1. Download and install VirtualBox


2. Run VirtualBox And Create New Virtual Machine

Using VirtualBox To Install an OS

  •  Start VirtualBox and select on the 'New' button to start the "Create New Virtual Machine" Wizard.

Using VirtualBox To Install an OS

  •  Choose a name for your Virtual Machine (VM), select an OS and its version from the list.

Using VirtualBox To Install an OS

  • At this stage, you have to select the amount of RAM you would like to dedicate to your virtual machine.

Using VirtualBox To Install an OS

  • If you have never created a virtual hard disk with VitualBox before (which I suppose here), then you would have only 1 option and that is to create a new one now.

Using VirtualBox To Install an OS
  • Now there are 2 types of hard drives that you can create using VirtualBox. First is the dynamically expanding one which uses less space in the beginning and expands as needed. This one is ideal for those with smaller hard drive. The second one is of fixed-size which is better in case you have a larger hard drive and can wait a few extra minutes while the virtual drive is being created.

Using VirtualBox To Install an OS
  • After that, choose a name for your virtual disk and assign a size to it. For OS like Windows or Linux, about 6-10 GB would be sufficient to install and run the OS for minimum usage level. But if you are interested in installing the OS for heavier use and for storing a moderate or large number of files even in that second OS, you should assign at least 50 GB to your virtual hard disk.
Using VirtualBox To Install an OS
  • Check the final summary and click on 'Finish' to complete the process of creating the virtual machine.

3. Attaching The Required Removable Media To Install The OS


After having created the virtual machine along with the virtual hard disk, the next task is to attach the removable media which contains your OS installation files like a DVD or CD.

Select the newly created VM and click on "Settings" icon. Then go to storage settings.

Using VirtualBox To Install an OS

As shown in the figure, select the empty storage below the newly created virtual drive and then assign the removable media you want to use with it. You can select a CD/DVD or even a pendrive.

Now you are almost done with your VM.

4. Run The VM And Install Your OS


The last step is to run your virtual machine and install the OS from the removable storage you selected just a few while ago.

Select the VM from the main screen and click on the "Start" icon.

That's it!

Your virtual machine will now start just like a brand new unused computer. Follow the installation steps you perform with any normal hard drive and install the OS on your virtual hard drive.

[Note: If you want to install Mac OS X on VirtualBox, refer this tutorial.]

After the installation is over, you can start using the virtual OS as you would use if you installed it on a separate partition! And that too without any risks, vulnerabilities or any kind of issues that you would face if you preferred a multi-partition system.

Tips And Summary On Using VirtualBox


  • VirtualBox is a simple and free solution to install more than one OS on your computer. There are a lot of issues with multi-partition systems that you can easily avoid with the help of VirtualBox.
  • To use more than 1 OS on your system, you need to install VirtualBox and create a virtual machine for your OS.
  • Assign enough RAM and hard drive space to your virtual machine so that it runs smoothly but doesn't trouble the main system at the same time.
  • Install your OS from the CD/DVD drive that you normally use and start using your 2nd OS! That too - within the same OS!
Facing any problems? Or any kind of errors? Be sure to drop a comment and let me help you!


31 shortcut keys for Microsoft Excel

31-shortcut-keys-for-Microsoft-Excel
Here are 31 handy keyboard Shortcuts that you can use on Microsoft Excel.
 
  1. F1: Opens a help task pane.
  2. F1 + Ctrl: Opens or closes the help window.
  3. F2: To edit the text in the active cell.
  4. F2 + Shift: To write a comment in the active cell.
  5. F2 + Alt: Opens the save as dialog box.
  6. F3 + Shift: opens the insert dialog box.
  7. F3 + Ctrl: Opens the define name dialog box.
  8. F3 + Shift + Ctrl:  Opens the create name dialog box.
  9. F4:  To redo the last command.
  10. F4 + Ctrl: To close the workbook window.
  11. F4 + Alt: To close the excel program.
  12. F5: Opens the Go to dialog box.
  13. F5 + Ctrl: brings back to the first level of workbook.
  14. F6: To shift between help taskbar and the excel window.
  15. F6 + Shift: To goto the previous square in the open worksheet.
  16. F6 + Ctrl: If more than one workbook is open to switch between them.
  17. F7: To open spelling correction window.
  18. F7 + Ctrl: When workbook window is not maximised it will move the window.
  19. F8: To activate / deactivate extended mode.
  20. F9: Will calculate all the worksheets in all open workbooks.
  21. F9 + Shift: Will calculate the active worksheet.
  22. F9 + Ctrl: To Minimise the workbook window.
  23. F10: Will select the menu bar.
  24. F10 + Ctrl: To open minimised window.
  25. F11: Will create a chart using the current range.
  26. F11 + Shift: To select a new worksheet.
  27. F11 + Alt: To switch between visual basic editor and the worksheet.
  28. F11 + Alt + Shift: Opens Microsoft script editor.
  29. F12: Opens save as dialog box.
  30. F12 + Shift: Saves the active workbook.
  31. F12 + Ctrl: To open the Open dialog box.
If you know more shortcut keys in Microsoft Excel then please feel free to have your say Smile

How To Check Your Windows OS For Errors

How To Check Your Windows OS For Errors  - Chkdsk - Screenshot
Chkdsk is a shorthand code for Checkdisk, and is a problem solving tool in your computer.
Chkdsk runs on your system checking specified disks for error, problems, and when prompted will help fix them. Unlike some system tools, this is not accessible from the menus and must be run through the command prompt.
The Commands:
To use Chkdsk, you are going to need to know and understand a few simple commands. If you are familiar with programming languages or MS DOS, this process will feel fairly comfortable.
Volume: (colon part of command) tells chkdsk which file(s) to run. Wildcard (* and ?) characters are accepted.
/f: command to fix error on files. If files cannot be fixed while running, chkdsk will ask if files should be checked during start up.
/v: lists the files on a disk as they are checked.
/r: locates bad sections and restores readable information
/x: Makes the volume dismount first, and includes the /f command. **
/i: command to run a more general chkdsk, takes less time.**
/c: does not check the cycles in the folders, reduces time to run chkdsk. **
/l[:size:]: reduced log size to specifications, if left blank will show current log size. **
/?: opens help and support from the command prompt panel.
** These commands can only be used with NTFS (New Technology File System), and is available on Windows operating systems Windows NT and newer, including Windows XP,Windows Vista, and Windows 7.
The Syntax:
Whenever you are working in command prompt, how you input commands will matter. They must be in the correct order and in the correct format, or you will get a syntax error back, which basically means that your computer can not understand you.
Follow the  5 steps below to input the desired command(s):
Step (1) Open main menu and click RUN. In the box, type “cmd”
Step (2) In the box, type “cmd”
Step (3) This Should open window with black background, white characters, and the last line should show: C:\Users\computername>
Step (4) Type in your desired command in this format: chkdsk[volume:][[path]filename] [/f] [/v] [/r] [/x] [/i][/c] [/l[size:]]
Step (5)
Not all commands will be used at the same time. Commands will vary depending on desired results.
Examples
If you want to run chkdsk on the D drive you may want to use: chkdsk d: /f
If you are looking to run a general check, type chkdsk *.* This will display a report of the current disk.
Reporting
Chkdsk will give you a detailed report of what it has done, which also includes various exit codes. The report will tell you if things have been fixed, how large the files are, and other pertinent information.
The exit codes are as follows:
  • No errors found.
  • All found errors were fixed.
  • Either clean up was performed or not performed because the /f command was not used.
  • Disk could not be repaired or checked; /f command was not used.
Note:
And remember, chkdsk is not a fast running process, depending on the size of the drive being checked, chkdsk can take hours or days to complete. Once started the chkdsk process cannot be stopped.


Tips Tricks And Tutorials

You can also receive Free Email Updates:

Widget by NBT

Tips Tricks And Tutorials

You can also receive Free Email Updates:

Widget by NBT

Tips Tricks And Tutorials

You can also receive Free Email Updates:

Widget by NBT